If you have purchased one of our special offers, you may have some questions. This FAQ’s for website designs page will provide most of the answers for you! If we haven’t answered your question, please just ask and I’ll add it to the list! If there is something specific that only relates to one of the themes, it will be listed under the theme design name. Thank you!

FAQ’s For Website Designs
- Website.
- Inside that folder, you will find all your instructions and the all important ‘Import Folder – New Website’.
- Inside that folder is the “file” you need to upload!
- That’s all you need to upload…just one file! No zips, no folders…just the file in the import folder.
You can watch one of the videos I have created. It doesn’t matter what design you have purchased, the steps are all the same!
If you need help please submit a ticket with your purchase details here. Submit Ticket Here
It is a special “import” file ONLY!
The ‘All In One Migration’ plugin is the only source/software that can use it. The file is exported using the plugin, and therefore requires the same plugin to import the file. It is specially created.
It is not corrupt, it is not broken…it is a file you simply have to drag and drop (or upload) into the plugin ‘import file’ section.
Adding Your Logo to The Media Library
- Upload your image to the media library.
- Click ‘Edit’ to copy the image URL.
- Save that for the moment.
Edit The CSS Stylesheet
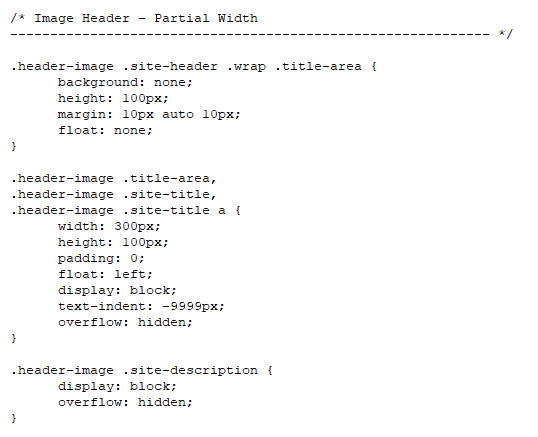
1. Look for this section in the CSS stylesheet.

2. You will see it says background: none; and it shows the height in 2 areas and the width in 1 area. Here’s what you have to do:
- Add the URL of your logo to the part that says background: none; like this:
- background: url(https://yourdomain.com/wp-uploads/date/logo.jpg) left top no-repeat;
- Next change the height of your logo (whatever yur logo image height is) in 2 places.
- Next change the width of your logo in one place. (I like them to be about 300px so they look nice on all devices.
If it looks like there isn’t enough space above or below your logo, you can change the size here:
- margin: 10px auto 10px
Genesis Settings
- Go to Genesis > Theme Settings
- Scroll down to ‘Use for site title/logo’
- Click Logo image
- Scroll down and save changes.
That’s it! You’ll have your logo looking perfect!
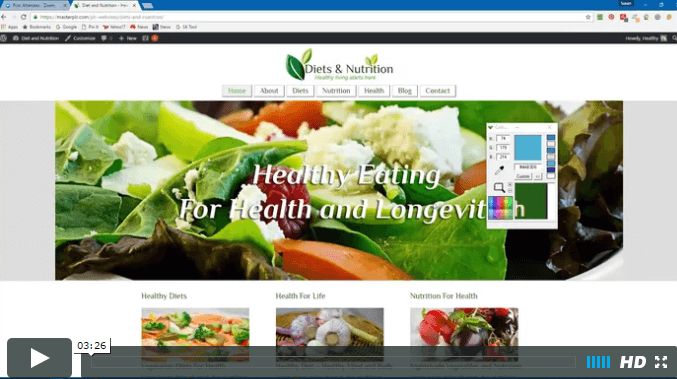
I also have a video here if your site has an image:
However, there are 2 options.
1) You can always create a dummy install on a temporary sub-domain and extract the theme that way. Then install on your own site and see (from your dummy install) how it all goes into place, as you can look inside and see what goes where.
2) Or I can do it all for you. I charge US$197 for this service. I do it all. I install everything and keep your content – I install the design, your logo, your contact details etc. I set it all up on my own domain (with all your content) and you get to see it all finished first. Then I move it all over to your domain (which is where your website and content is currently).
If you would like me to do it all for you, please submit a support ticket.
You can change the image by going to your “theme > images” folder. The easist way is through cPanel or your FTP program. I love using Filezilla.
However, some sites may have these installed:
- ‘Diets and Nutrition’ website, go to “Appearance > Simple Responsive Slider”.
- ‘Stress and Your Health’ website, go to the Genesis Responsive Slider, found in “Genesis > Slider Settings”.
- All other themes have the Soliloquy Lite WordPress plugin.
- Look for Soliloquy in the left hand side of your dashboard. There you can edit the slider images for the homepage.
The Soliloquy plugin is my personal favorite! I didn’t realize there was a lite version when I began creating these designs for you.
I have the lifetime version which has lots of goodies, and if you would like all the added features, you can right here.
To remove the author info or the date info from the top of the posts, you have to add some code into the functions.php file. I have pasted the code in the comments section below…as the code doesn’t play nicely in my post. 😉
Look at the comment I made on April 2nd, 2017. Thank you!
https://masterplr.com/how-i-use-plr-to-generate-sales/
You are basically trying to delete the person logged in…which is impossible to do. You have to log out and then log back in as ‘you’ the new user, then you can delete ‘me’. Make sure you assign all posts to you!
Down the bottom you’ll see a ‘Restore Default Settings’. Click that and save. Now you’ll see the meta area.
Remember…don’t stress if you don’t get a green light! Your page may have a high flesch score, which is fine! It just means your content is excellent and written for a highly intelligent audience! 🙂
Diabetes Theme – Additional FAQ’s
<div>
<h3 style=”text-align: center”>We provide information on diabetes and natural treatment options!</h3>
</div>
As for the specific sizes, the design is mobile responsive, however this is what is in the demo theme:
- The 2 smaller ones are 768 x 512 (the height needs to be at least 275)
- The bigger image is only 768 x 533 (although the height is set to 580, so this one can be up to 1190 x 580).
Being a mobile responsive design they automatically resized.
- Or if you really want to have them changed, hire someone to do it for you.
- Or if you would like to hire me, I will make the changes required with your new category and homepage image placements for US$50.
If you want to do it yourself, you have to know code, and make the changes of your new categories in the old category places in the Wp_Query strings. For example:
$the_query = new WP_Query( array( ‘category_name’ => ‘type-1-diabetes’, ‘posts_per_page’ => 1 ) );
If the images have all gone weird, the code is broken. Here’s the code you need to place in the ‘text’ (not visual) part of the EZ Feature widget.
<section id=”featured-content”>
<div id=”featured-one” class=”two-thirds first”>
<div>[categorypost1]</div>
</div>
<div class=”one-third”>
<div id=”featured-two”>
<div>[categorypost2]</div>
</div>
<div id=”featured-three”>
<div>[categorypost3]</div>
</div>
</div>
<div class=”clear”></div>
</section>
In your WordPress dashboard, go to Appearance > Theme File Editor > Theme Functions (functions.php). Find the line 262 and change the line 262 and 263 to this:
262 /** add_filter( ‘dropdown_menus_select_current’, create_function( ‘$bool’, ‘return false;’ ) );
263 */
Then click the button below ‘Update File’
 SSL Encryption and WordPress Backups and Updates
 Setting Up Your Squeeze Page
 How To Change Your Website Colors

Remove Author or Date Info From Posts
I’ve been asked how to remove the author info or the date info from the top of the posts, so I have provided the code here for you.
You have to add the code provided into your functions.php file.
Here is the code to remove just the author:
/** Customise the post info info function */
add_filter( ‘genesis_post_info’, ‘genesischild_post_info’ );
function genesischild_post_info($post_info) {
if (!is_page()) {
$post_info = ‘Posted on [post_date] [post_comments] [post_edit]‘;
return $post_info;
}
}
Here is the code to remove just the author, date and comment link:
/** Customise the post info info function */
add_filter( ‘genesis_post_info’, ‘genesischild_post_info’ );
function genesischild_post_info($post_info) {
if (!is_page()) {
$post_info = ‘[post_edit]‘;
return $post_info;
}
}
Change Homepage Images In Diabetes Theme
Look for the JPG files in the ‘Stylesheet’ (style.css) and change to your desired image URL. Here is what you need to find:
#featured-one {
background: linear-gradient( rgba(40,40,43,0), rgba(40,40,43,0.4) ), url(//yourdomain.com/diabetes-theme/wp-content/uploads/2017/05/Diabetes-Diet.jpg);
background-position: center top;
background-repeat: no-repeat;
height: 580px;
background-size: cover;
-webkit-background-size: cover;
-moz-background-size: cover;
-o-background-size: cover;
position: relative;
}
#featured-two {
background: linear-gradient( rgba(40,40,43,0), rgba(40,40,43,0.4) ), url(//yourdomain.com/diabetes-theme/wp-content/uploads/2017/05/Diabetes-Treatment.jpg);
background-position: center top;
background-repeat: no-repeat;
height: 275px;
background-size: cover;
-webkit-background-size: cover;
-moz-background-size: cover;
-o-background-size: cover;
position: relative;
margin-bottom: 30px;
}
#featured-three {
background: linear-gradient( rgba(40,40,43,0), rgba(40,40,43,0.4) ), url(//yourdomain.com/diabetes-theme/wp-content/uploads/2017/06/type-2-diabetes.jpg);
background-position: center top;
background-repeat: no-repeat;
height: 275px;
background-size: cover;
-webkit-background-size: cover;
-moz-background-size: cover;
-o-background-size: cover;
position: relative;
}
Hello Susan,
Do I have to renew and update the paid themes, plugins used in these website designs every year?
Thank you
Hi,
In any WordPress websites you have to update the plugins and themes to prevent any vulnerabilities. So I highly recommend you do! You can now ‘auto-update’ for individual plugins etc., too, which is a great new WordPress feature.
Thank you for asking!